
One of the most useful and challenging elements of Magento’s admin panel is the Import/Export section. Here we can import and export customer and products en masse via CSV instead of having to enter them one by one. However, the process of importing products remains notoriously opaque with very few reliable sources describing exactly how the process should be done. Errors pop up all the time, causing the entire process to halt.
First of all, let’s visit the page for importing products through dataflow.
1) Log in to the Admin Panel as an administrator.
2) Click System > Import/Export > Dataflow – Profiles. The Profiles page displays available profiles. By default, Magento ships with several default profiles. The one we’ll use for this tutorial is named Import All Products.
3) Click Import All Products.
On the main page of Import All Products nothing needs to be touched. If you click the next tab down on the left-hand navigation titled Upload File, you will see three file upload buttons. This is where we would upload a select CSV file to import.
Now for the CSV itself, which is the step that can be the most confusing. To successfully import products, there are a few columns, or product attributes that absolutely need to be present.
Those are as follows:
– sku: Stock Keeping Unit
– name: Name of the product
– attribute_set: Attribute set to be applied to product (basic value to enter is Default)
– type: Product type (such as simple or configurable)
– price: The product’s price
– weight: The product’s weight
– description: A product description
– short_description: A short product description
– status: Whether the product is Enabled or Disabled
– visibility: How the product can be viewed on the frontend (options are Catalog – Search – Catalog, Search – Not Visible Individually)
– tax_class_id: Either None, Taxable Goods, or Shipping
– qty: Number of product in stock
Two other important attributes to consider when making a basic product import are:
– store: Store to be added to if you have more than one store (basic value to enter is default)
– is_in_stock: 1 for “Yes”, 0 for “No”. Not including this attribute as 1 could result in your products initially registering as not being in stock and therefore won’t be visible on the frontend until you set them to in stock. It shouldn’t stop the import process though.
Here is an example of what a CSV would look like with all the attributes I’ve described above:

Once you have your CSV saved and ready to go, return to the Upload File page of the Import All Products dataflow profile.
1) Click Choose File and choose your CSV.
2) In the upper left hand corner of the page, click Save And Continue Edit.
3) Click on the Run Profile tab in the left nav.
4) Select your CSV in the select drop down. The name will look slightly different after being timestamped.
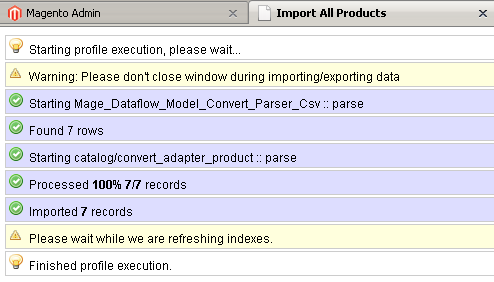
5) Click Run Profile In Popup.
Your products should now import. Upon completion of the import, your popup screen should look something like this:
One of the most common issues people run into while importing products, that causes the process to fail on a per product basis, is the inclusion of irregular ASCII characters in name, description, or short_description. Be sure to clean these out if there are any. Here is a link to a table of these ASCII characters, as well as HTML Character Codes that can be used in description and short_description (but not name) instead of ASCII characters.
Following these instructions should result in a successful, basic product import.

